Leather crafting is a timeless skill that blends practicality with creativity. Whether you’re a seasoned leatherworker or just getting started, this DIY leather keychain is a perfect project to hone your skills. This guide will walk you through each step of the process, from selecting your materials to finishing your creation.
Supplies Needed
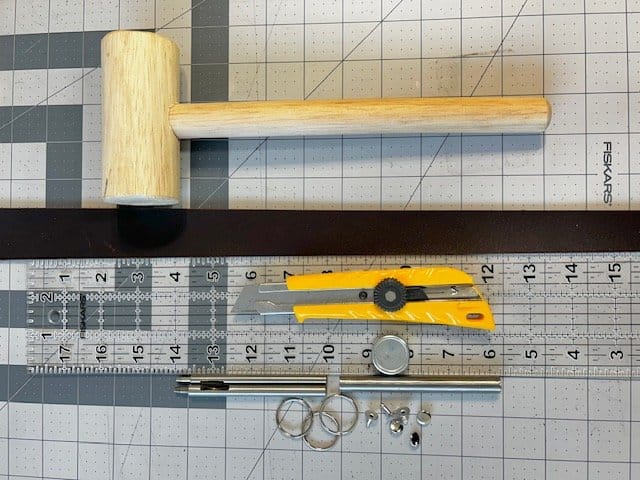
Before diving into the step-by-step instructions, let’s gather the necessary supplies.
- Leather: Choose a piece of leather, ideally around 4-5 oz in weight. This thickness provides the right balance of sturdiness and ease of cutting.
- Cutting Tools:
- Rotary cutter or utility knife
- Cutting mat
- Ruler: A ruler or straight edge for precise measurements.
- Hole Punch: A set of hole punches in various sizes. Some rivet kits come with a punch, such as the one I linked to under Rivets and Setter.
- Key Ring: A metal key ring or split ring.
- Rivets and Setter: To attach the key ring to the leather.
- Mallet: For setting the rivets.
Step-by-Step Instructions
1. Designing Your Keychain
Begin by deciding the design and dimensions of your keychain. A simple and effective size is ⅝” inch by 8 inches, which will accommodate the key ring and provide enough space for a personalized touch.
2. Cutting the Leather
- Measure and Mark: Use your ruler to measure and mark the dimensions on the leather piece. A 5/8 inch by 8 inch strip is a good starting point.
- Cutting: Place the leather on a cutting mat. Using a rotary cutter or utility knife along with the ruler as a guide, carefully cut out the leather strip. Make sure your cuts are straight and even.
3. Punching Holes
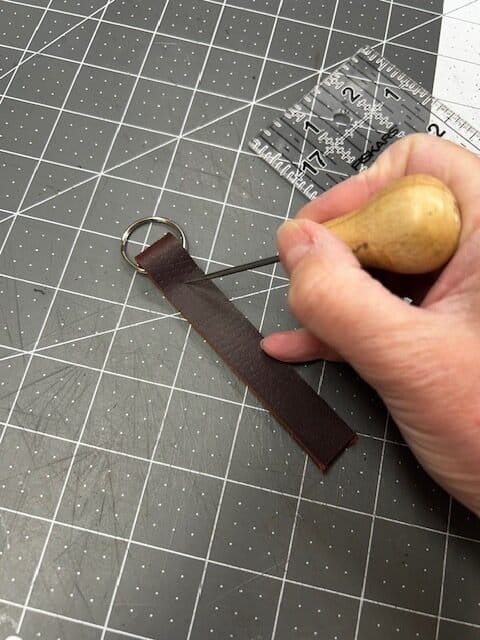
- Marking the Hole: Fold strip in half around the key ring and mark where the rivet will go – usually about 3” from each end. Mark both spots. This is where you will punch a hole for the key ring.
- Punching the Hole: Select a hole punch that matches the diameter of your rivet. Place the leather on the cutting mat with a scrap piece of leather between the mat and your keychain (this will help the hole punch from going through your cutting mat), align the punch with the mark, and strike it with a mallet to create the hole.
4. Attaching the Key Ring
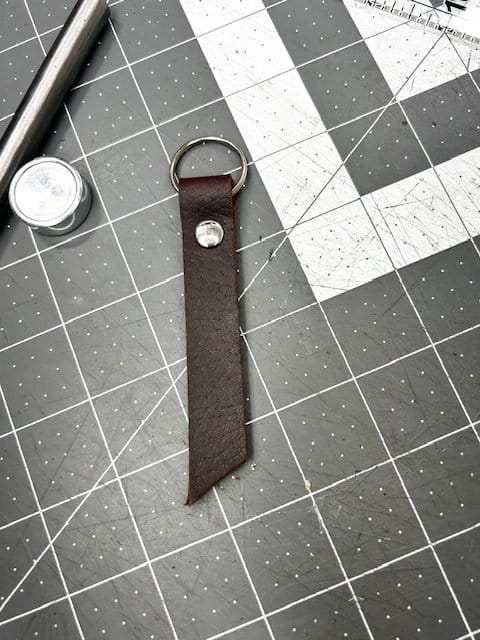
- Inserting the Key Ring: Fold the leather strip in half, aligning the ends. Insert the rivet and cap through the hole you punched earlier.
- Securing with Rivets: Use the rivet setter and mallet to secure it in place. Ensure the rivet is firmly set and the leather strip holds together securely.
5. Adding Personal Touches
Now that your basic keychain is assembled, consider adding some personal touches:
- Stamping: Use leather stamps to emboss initials, a name, or a decorative pattern onto the leather.
- Painting: Add some color accents with leather paint, if desired.
- Cutting: For an extra decorative touch, consider cutting the ends on an angle.
That’s it! You now have a leather keychain that you made yourself!
Tips for Success
- Practice Makes Perfect: If you’re new to leatherworking, practice on scrap pieces before working on your final project.
- Patience: Take your time when cutting and punching.
- Tool Maintenance: Keep your tools sharp and clean for precise cuts and professional results.
- Experiment: Don’t be afraid to experiment with different shapes, sizes, and designs. Leatherworking is an art, and creativity is a big part of it.
Conclusion
Creating a leather keychain is a rewarding project that combines both functionality and artistry. By following these step-by-step instructions, you’ll not only make a beautiful and durable keychain but also gain valuable leatherworking skills that can be applied to more complex projects in the future. Enjoy the process, and happy crafting!
FAQs
Q: What type of leather is best for keychains? A: Leather around 4-5 oz in weight is ideal for keychains due to its balance of sturdiness and ease of cutting, but if you are just starting out, use what you have!
Q: Can I use synthetic leather for this project? A: While synthetic leather can be used, genuine leather is recommended for its durability and traditional appeal.
Q: How can I ensure my cuts are straight? A: Use a sharp rotary cutter or utility knife along with a metal ruler for guided, precise cuts.
Read more leatherworking tips here ➡️ BLOG