Welcome to my Tools for Beginner Leatherworking Guide.
In 2018 when I decided I wanted to give leatherworking a try, one of the things I had to figure out was which tools do you actually need for beginner leatherworking. Of course I went on Google, Instagram and Pinterest to try and get as much information as possible. It was extremely overwhelming and a bit confusing. A lot of the tools were pricey, and I was hesitant to invest too much into a craft I wasn’t sure I’d love or know how much I’d be doing it. I grabbed a bag of leather remnants, a hole punch, thread and needles and set out to try the craft. All four of the items I bought were about the worst quality I could’ve found and I almost gave up. In all honesty, I bought them from a craft store which had no selection. The leather was old and dry, the punch couldn’t punch itself out of a wet paper bag, and the thread was chunky and nowhere near suitable for the size of holes. I’d like to save you the disappointment.
With a bit more research, I was able to start gathering a few better tools and found leatherwork to be really enjoyable. I still ended up purchasing tools I have barely used, but others I still use to this day.
I made this list of which tools do you actually need for beginner leatherworking in hopes to help out someone new to the craft. If you become hooked on leatherwork, like I did, you can eventually upgrade some tools. As you build your skills, and discover what you enjoy making, you will then be adding useful tools to your kit.
*I’m including some affiliate links to products for your convenience. If you choose to purchase after clicking a link, I may receive a commission at no extra cost to you.
1. A Leatherwork Book
I always find it helpful to have a good reference book with a few simple patterns to refer to when starting out.
2. Leather
Of course, you’re going to need leather! There is a huge variety of leather available on the market. Take the time to read and learn about the different types of leather. Leather comes in a variety of thicknesses as well as temper (soft, medium, stiff). Some suppliers sell it by the square foot, which is great for getting started. Even if you are able to find a remnants bag, with a little knowledge, you will be able to pick pieces suitable for your project.
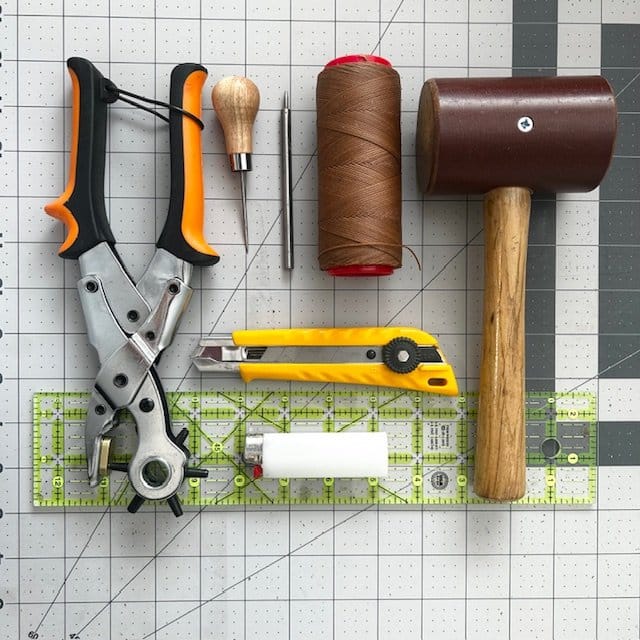
3. Self-healing cutting mat
These protect your work surface, and prolong the life of your cutting blade. If you sew, you will likely already have one! If not, they are usually readily available online or at your local craft store. I prefer a 24×36” mat, but for starting out or if you have limited space, you can start with an 18×24”.
4. Knife
This is the most efficient way to cut leather. Every leatherworker has their preference, and mine happens to be an Olfa Utility Knife. They’re inexpensive and not having to worry about sharpening a blade is a win for me. I break off the blade frequently to keep my edge sharp so my leather cuts are nice!
5. Ruler
This is important for straight and square edges. A quilting ruler comes in handy to keep edges square, but if you are just starting out, a simple metal corked backed ruler is also good.
6. Scratch Awl
Used to mark patterns on leather, or hole placement – It can even punch a hole if needed. A scratch awl is little, yet so useful.
7. Glue
The first glue I bought was a tube of rubber cement. It did the trick, but it had to be used in a well ventilated area, which wasn’t always an option. If your budget allows, I suggest a water based non toxic glue.
8. Punch Pad
This is what you will put your leather on when punching holes. It’s important to use so you don’t damage your tools. I use a poly plastic punching board, but started with a white cutting board from my kitchen!
9. Hole Punches
For leatherwork you have to make the holes for stitching. As I mentioned above, the first hole punch I bought was a piece of junk. While the selection of punches range from inexpensive to very expensive, I have found some affordable options that work for me. Deciding on whether you want to use a diamond shape, or round shape is going to depend on personal preference. Some makers swear by one or the other. I tried the diamond punches, but ended up preferring the round shape. For stitching I use this single 1mm punch, and I also have a revolving punch with different hole sizes to meet different needs.
10. Mallet
This will be used to hit your punches with. You don’t want to use a metal hammer as it will damage them. Leatherworking mallets come in a few different styles as well as materials. I used a cheap wooden mallet to start. You can get wood, nylon and rawhide mallets. Nylon seems to be the most used.
11. Stitching Needles
These needles are usually blunt tipped needles, so they don’t pierce the fibres of the leather when you insert it into your premade hole. You may have to try a few different sizes before you figure out which you prefer.
12. Thread
My mistake was buying super chunky thread, and it was terrible to work with. While thread used for leatherwork is usually thick, it’s important to find one that works with the size of holes you are punching so you aren’t fighting to sew with it. My preference is 1mm round holes with 0.8mm waxed thread.
I hope you find this list useful. If you’d like more information on tools for beginner leatherworking, please contact me!